 Home
Home Sewing, Embroidery & Serger
 Cutting machines
 Brands
 Review

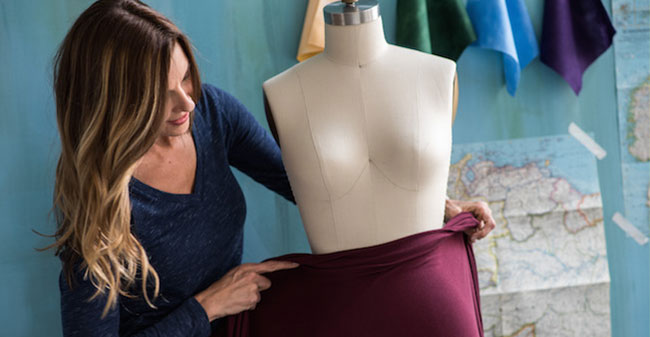
Many amateur and home dressmakers do not know how to use a dress form, as they believe it is used only in the industry and by sewing/ tailoring experts. However, using a dress form is an important skill regardless of your sewing ability, and knowing how to use a dress form to make a pattern will help you massively if you are sewing for a hobby, for personal use or for a profession. This article will outline how to use a dress form to make a pattern, different draping techniques using a dress form and the tools needed to help you sew, drape and overall use a dress form to its full potential.
If you’ve finally managed to make your own dress form, follow this step by step guide that will cover such areas as form, draping, sewing a hem and using a dress form to make a pattern.
What is draping and why is it necessary to make a pattern?
Draping is a form of making a dress pattern using a dress form. Unlike drawing a dress pattern on flat, evenly spread fabric, draping positions the fabric over the dress form in 3 dimensions, allowing the dressmaker to visualize unusual or uneven patterns in fabric, such as ruffles or other shapes that aren’t symmetrical. There are various draping techniques one can follow when wondering how to use a dress form to make a pattern, and the following guide will outline some of these.
How to use a dress form to make a pattern?
1. Prepare the dress form:
Before getting started with the draping process, it’s important to know how to make your dress pattern. Sketch out a simple dress pattern in the style you want- this will be your guide for preparing the dress form and for making the final dress pattern. Use bias tape to mark out the major seams and hems of the pattern you’re hoping to create in a fabric. The bias tape should be pinned down to the dress form following the lines it will eventually dictate on the dress itself. Ensure the bias tape isn’t twisted at any point and is lying flat and taught against the dress form.
2. Tools you will need:

- Measuring tape
- Scissors
- Fleece or a similarly thick material to provide padding for the dress form
- Bias tape to mark the outline the fabric will follow
- Draping fabric- normally muslin but a non-stretch artificial fabric will suffice
- Pins
- Sharpie
- Pattern paper
- Pattern transfer paper
- Tracing wheel
3. Begin draping:
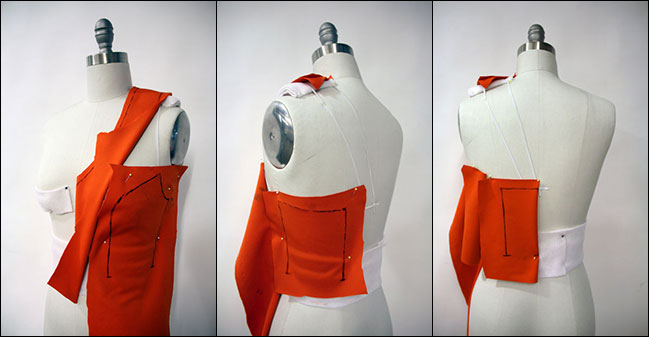
- Using the muslin fabric, drape this over the dress form and pin it down evenly and flat against the grain. Moving on, pin the muslin along the bias lines you marked out earlier using the bias tape. This can be done on one side only (split from top to bottom) and then transferred as a mirror image pattern on to the opposite side later
- Cut the muslin following the lines set out by the bias tape. When cutting around the arm and neck holes leave an excess of fabric of around 5 centimeters. Cut the dress accordingly around these areas and smoot the remaining muslin against the dress form.
- In the same way as the front, smooth the dress out against the back of the dress form. Pin the muslin against the form and bias lines as before and then cut accordingly
- Once all the required neck and armholes are cut, use a fine pencil to trace the pattern made by the bias lines on to the muslin fabric itself. Use the pins that are holding the muslin to the bias lines as a guide and join these points together with a pencil.
- Take the pins out of every part of the muslin, leaving behind only the pencil marks and lines. Take a straight edge ruler and use this to help you draw the straight lines of the dress pattern accurately
- Fold the side of the muslin with the pattern drawn on over the centerfold made earlier by the top to bottom fold along the dress form. Using your hands, apply pressure and rub the fabric along the pencil lines- these will transfer on to the unmarked side of the fabric creating a symmetrical design pattern
- Try the partially finished muslin fabric on your self and take some selfies in a mirror to fully inspect how the bias line marks in pencil match up to the shape of your own body. This is a helpful step to complete at this early stage as it is still viable to amend the design pattern before making any final cuts or beginning to sew the final shape.
- Ensure throughout that you follow the design as will be when worn- hanging from the high point of the shoulders and downwards. Take as many times as necessary to get this pattern matching up evenly and symmetrically when worn
- After you have corrected the shoulder pattern on the fabric, following the same procedure for the seams on the side of the dress. Moving the dress around while wearing it, ensure the side seams are completely straight and vertical without any curvature.
- At this stage, you have finalized the design pattern thanks to the help of your dress form. Take each design pattern piece of muslin and iron out all the creases
- Take each piece of individually cut muslin and trace around the perimeter on to pattern/ craft paper. Correct any smudges or imperfections in the muslin with a marker on the paper.
- Cut out the paper and you are left with a bespoke designed dress pattern of your own, ready to be transferred on to the fabric of your choice!
Tips:
- Want to know how to use a dress form to make a pattern? Want to improve your draping techniques? You need patience and practice! This is a method that takes time and personal investment to improve on
- Ensure each time when removing pins and trying the muslin to take care not to miss any, as these can scratch hurt the skin if left unnoticed
- Ironing pieces of fabric throughout the process can help when trying to visualize the final dress form
- If trying the process for the first time, using a friend as a model can help- you can usually spot errors and areas for improvement when the dress pattern is draped on someone else
Conclusion:
This article should serve as a good introductory guide on how to use a dress form and to design your own pattern. The draping techniques outlined in this step by step guide are a general guide, but feel free to experiment and play with them to help you find your own preferred technique. Designing a dress pattern from scratch is time-consuming but extremely satisfying, so ensure not to rush or skip steps. Enjoy!


")


