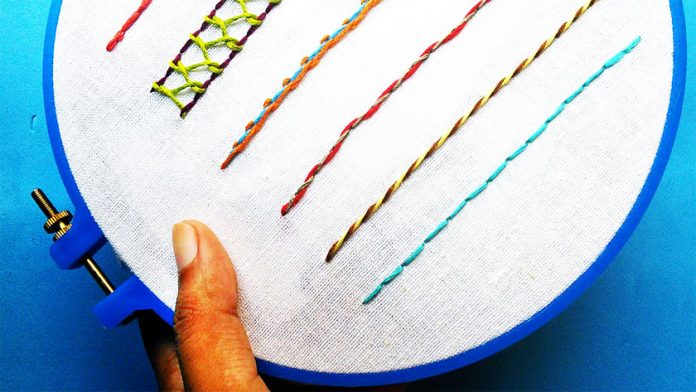
Backstitching is a simple technique used by many to make designs pop out in their embroidery work. It has a few different uses depending on your preferred type of stitching and embroidery work. It helps to outline and highlight imagery and details, and if you’re planning to start your own embroidery business, being familiar with it is a must. So if you want your designs to really pop, follow this easy guide on how to backstitch!
What is Backstitching?

Backstitching is a form of stitching that involves the thread being used to be doubled back on the already laid out stitch. It’s very helpful and sometimes necessary. Backstitching seems like a huge challenge on its surface, but once you get into it, it’s quite simple! It’s an easy stitch to perform both with a machine and by hand, so worry not!
Why is Backstitching Necessary?
As previously discussed, in the world of embroidery, backstitching helps to highlight and outline imagery in the artist’s work. It is also used to add an extra kick of detail to any piece you may be working on. It helps with fine lines and forms the foundations for combination stitches. In sewing, the backstitch is commonly used to bring two separate pieces of fabric together in a strong and reliable way.
Backstitching also serves as an amazing practice technique for those who are just starting out. Don’t be afraid to give it a shot. Backstitching provides a great look to any project that may seem a bit drab.
How to Backstitch with a Sewing Machine

The first step in backstitching is simply laying down your foundation stitch. This will provide the basis and guide for the rest of your stitches. Sew out about five or six stitches as you normally would.
Now, most sewing machines today have a backstitch setting. If this is the case, activate the button that will initiate that setting. After putting your machine in backstitch mode, stitch back over your initial stitch five to six times. Finally, you release the backstitch button and go about sewing as you typically would. That’s all it takes! It’s really that easy!
If your sewing machine does not have the option of sewing in reverse or a backstitch setting, you’ll have to do some extra work. First, when you’re starting a seam, place the entirety of your fabric beneath the presser foot, making sure to align it with your seam guide and generally, just the back of the presser foot.
Begin to sew in reverse for a few stitches until you reach the very end of the fabric. Stop after that and begin sewing forward along the length of the seam. Ensure that you’re keeping the seam guide lined up to sew a consistent and defined seam pattern. Seam your fabric end to end, then stop, and sew in reverse for a few stitches. This will provide an awesome backstitch with no setting on your machine.
How to Hand Sew a Backstitch

Not everyone has access to a sewing machine at all, so by following these steps, anyone reading this will be able to perform a solid backstitch with a bit of practice. You need to start my knotting your thread, make sure you double it up if you must. Of course, you’ll need to thread your needle after that.
Next, simply put the needle through the back of the fabric, up to about ¼ an inch. Pull the thread all the way up to the knot and lay your first stitch. Remember, the smaller the stitch, the stronger your results will be. Now you’ll have to make a small backstitch, inserting the needle back at the knot. You’ll then need to pull the needle up, this time, just in front of your new stitch. Pull your needle through and repeat this process along the seam.
How to Backstitch in Cross-Stitch

In cross-stitching, the backstitch technique is specifically used to outline your pictures or letters on the fabric. This stitch adds a sense of dimension and depth, causing the graphics you’ve made to pop out a bit more. It is recommended that you used a dark-colored or black thread to create a much more well-defined outline and/or foundation.
To start, you need to create your initial stitch, as always. Holding tightly onto the cut end of your thread, bring the needle up through the back of your fabric. Stay in the same line that you started in and work backward from where you started. It’s that simple. Backstitching in cross-stitching is simple.
Don’t start stitching randomly or your design won’t be highlighted properly. You can stitch in just about any direction so long as it follows your shape or outline. To stitch diagonally, you simply place the needle diagonal from your initial stitch and just work from there. By carefully stitching and working around your picture, letter, or graphic, you can make just about any shape you want.
Wrapping it Up:
Backstitching is a simple technique achievable with just a little bit of practice. It’s a method in which doubling back on an initial stitch creates a sharper and darker border. It can also bind two pieces of fabrics together quite well. It’s good practice for people new to the sewing scene. Whether you embroider, cross-stitch, sew, or hem, you’ll have to accomplish the backstitch eventually, even if it is just a sewing machine backstitch.
To backstitch with a sewing machine, if you have the backstitch setting, it’s as easy as the push of a button. However, if you don’t have this setting, you can achieve identical results with some extra work. If you don’t have a machine at all, it may be a bit harder to successfully backstitch, however, that does not mean it isn’t possible.
By following the above guides, you should have no problem figuring out which backstitching technique is best for you. It takes time to master something like this, so be patient. Don’t be discouraged if it’s hard at first. After some time, you’ll get the hang of it. Just stay dedicated. Make sure you’re keeping up with your machine and sewing materials!
 Home
Home Sewing, Embroidery & Serger
 Cutting machines
 Brands
 Review


Well I have done this with a skirt I made some years back . First I put som pegs along the hem and left it on the dress form for about a week . The amount of dropping was pretty amazing . This us how Vionnet did it . Then I fold io about 1/8 of an inch and using a very small stitch hemmed it up . Then use you duck bill scissors and trim and bits away ,press it and repeat . It works beautifully and creates a beautiful fluid hem . At the seams you can cut away bulk on the bias before you start . Paco Peralta describes this method as well . It us better than hand heming . I really love using my old straight stitch machine for this . If you don”t have one use the straight stitch plate on your machine and your straight stitch foot.
Thanks a million for sharing your real life experience with us! Hope this post will aid you to implement these Backstitch arts more efficiently than ever! Expecting your precious presence on our site again and again. Spread the love! 🙂