 Home
Home Sewing, Embroidery & Serger
 Cutting machines
 Brands
 Review

In this guide, I’m going to give you an easy way to remove embroidery from your clothing. First, I’m going to break down what tools you’ll need to successfully get the job done. I will then break down different ways to remove different types of embroidery. Hopefully, by the end of this article, you’ll know of at least one easy way to remove embroidery from whatever it may be that you’re working on.
Tools You’ll Need:
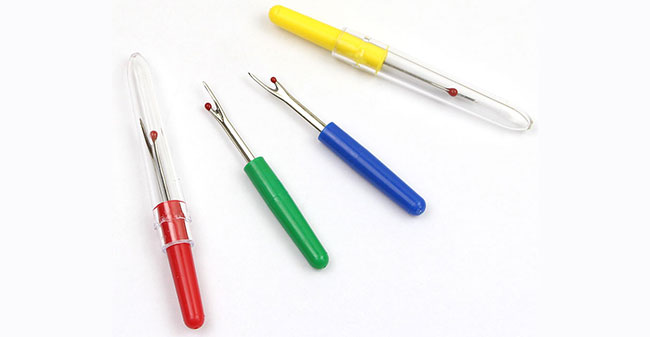
The first embroidery removal tool you’ll need is called a seam ripper. This tool is primarily used to tear stitches in order to remove them entirely. Seam rippers typically have a plastic handle with a forked metal head that almost resembles a knife without a blade. The tip of the metal head is sharp to allow the tool to easily get under stitched threads to tear them out in a clean manner. Having this tool is essential for the removal of embroidery, so make sure you have one on hand.
The next tool you’ll want to have is a simple pair of tweezers. Most people have these lying around their homes. They are most easily described as a pair of metal pinchers. This tool is used to pick up and pull small items, such as; hairs, threads, and screws, to name just a few. These are important to have on standby, as pulling torn threads from a stitch with just your fingers can prove to be highly difficult, if not impossible.
Make sure you have a magnifying glass handy as well. This tool can help when it comes to being able to see what it is that you’re doing. Magnifying glasses do just as their name implies. They allow a user to easily see things that are much harder to identify with the naked eye. Keep in mind that you’re going to be working with very tiny pieces of stitched thread. In order to accurately grab and pull the threads in order to release them, you’ll need to be able to determine what pieces you’re grabbing. If you can’t tell which threads you’re pulling on, you won’t be able to remove any embroidery.
The last tool I’ll tell you about is extremely helpful for embroidery removal. Make sure to have a lint brush on hand for those pesky stray threads and strings. Also called lint rollers, these helpful tools are made up of two general pieces. A plastic, wooden, or cardboard handle, attached to a roll of adhesive paper.
These tools are used to remove threads, hairs, and other unwanted minuscule debris, like lint and dust. Stray shreds of thread tend to get everywhere and anyone with any sewing experience knows this to be true. A messy workspace is not a stable one. Whether you’re removing embroidery from nylon or shirt material, you’ll definitely want to have a lint brush. If you don’t have access to one of these, duct tape or scotch tape will do the trick just the same!
Aside from the essential sewing tools for dressmakers, you should have these basic tools to effectively follow this guide to an easy way to remove embroidery. To start, I’m going to break down what you need to do in order to remove embroidery from shirt material. We’ll then touch on what you need to do when it comes to removing embroidery from nylon. This is the easy way to embroidery removal!
Removing Embroidery from Clothing (Shirts)
If you have a shirt with a logo of any kind that you want to be removed, follow these easy steps directly and you can get that graphic right off! The removal of embroidery from clothing isn’t complicated, really. You just need to use caution and pay attention to what it is that you’re doing with that seam ripper of yours!
Removing Hand Embroidery
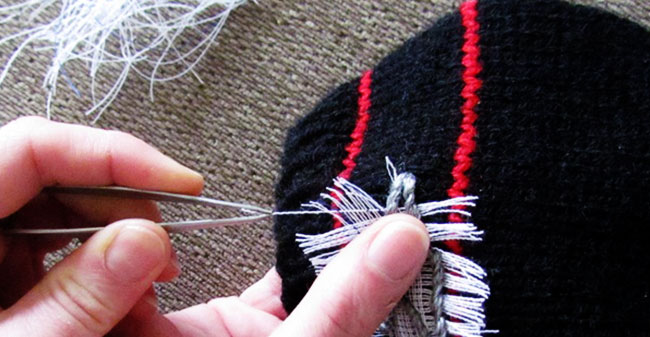
The first step to successful removal of embroidery from a shirt is turning the shirt inside out. You want the back of the embroidery to be completely exposed so you can easily work on removing the threads. After flipping the shirt inside out, slide your hand inside so that the stitches you are trying to remove are resting in your palm. This will provide stability as well as an easy way to see clearly what it is that you’re doing by giving you the option of bringing the shirt closer to your face for better visual analyzation. The better you can see what you’re working on, the better your outcome will be.
Next, you’ve to use your seam ripper. Take the sharp forked head I mentioned in the tools section and slide it under a small section of stitches. These stitches are often very small, so I suggest sliding the point under five or six of the stitches. Now you need to gently push the seam ripper away from you in an easy forward motion, thus, cutting the stitches that bind the embroidery to your shirt. Make sure you’re gentle, that way you don’t rip through the shirt or any other threads that weren’t meant to be cut.
The following step requires you to turn the right-side out, allowing you to remove the logo image or graphic, along with your torn threads. If you’re having a hard time seeing which threads are torn and need to be pulled out, now would be a good time to utilize your magnifying glass. This will give you a much better visual context as to what is going on with all those teeny tiny little threads. You may come across a detailed section that makes it difficult to be able to see what you need to do. Therefore, you have that magnifying glass! It makes things easy that way. Repeat these steps around the entire embroidery.
Once you’ve completed the removal of the stitches, run the lint brush over the front of your shirt. This will catch any of those pesky stray threads after you’ve removed the embroidery stitches. That’s all it takes! You’ve completed the removal of the embroidery stitch! Just remember, some embroidery stitches can be complex and complicated. Make sure you’re careful with what you’re doing and with what threads you tear. You don’t want to end up with a large hole in your shirt! Clothing can be expensive, so watch out!
Removing Machine Embroidery>

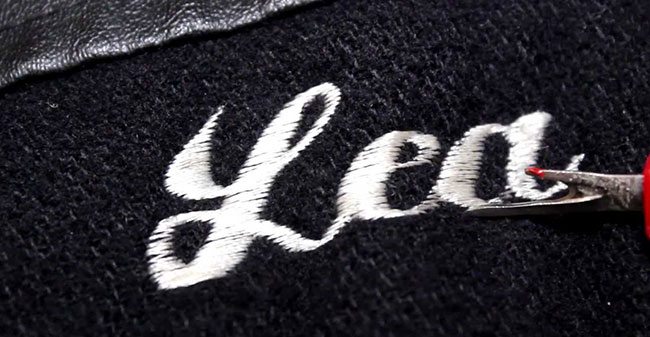
An easy way to remove embroidery stitched by a machine is to follow these next few steps. Unlike the embroidery removal of handstitched graphics, removing machine embroidery is a bit complex. It isn’t hard, so don’t worry too much. It’s not, however, any easier than removing hand-stitched embroidery. The steps are similar, however, there are a few key differences that I’m going to touch on.
You start off the exact same way as you would if you were following the steps from the last section. Removing stitching from clothing is relatively universal. Turn the shirt inside out and slide your hand inside. Rest the section of stitches you want to be removed in your palm, just like before. As previously mentioned, this provides stability and the option to visually get a bit closer to your project.
Look for a white bobbin thread. It’ll be much smaller than the stitches in the handstitched clothing removal of embroidery. Once located, insert your seam ripper just as you did before. This time, though, you’re going to push it forward, gently, under 30-40 of the stitches. Often, you’ll find what is called a stabilizer in between the stitches and the shirt. Once you’ve gone around and cut the threads needed, the stabilizer thread should be revealed and visible. Whatever you do, do not, under any circumstances, cut that stabilizer thread. It protects your shirt from any damages. The goal is removal, not to ruin a perfectly good article of clothing.
Now, you’ll turn your shirt right-side out, just as before. Begin to use your tweezers now, to pull the threads out from the embroidery. If you experience any resistance whatsoever, make sure to stop right then and there. If that happens, ensure that your threads are all properly torn by the seam ripper. Repeat the previous steps until all of your stitches were removed and you’re able to release the embroidery from your shirt. Remember, you’ll want to use your lint brush in order to get your shirt clear of any loose fibers and/or threads. Don’t forget, if you don’t have a lint roller, you can achieve identical results by using scotch or duct tape instead. And there you have it! An easy way to remove embroidery done by a sewing machine!
Removing Embroidery from Nylon
Often times, bags that people use on a daily basis are made from nylon. Commonly, nylon bags have some type of embroidery on them. If you’re not a fan of the graphic, or if you just want to remove it and replace it with your own, I’m going to tell you the easiest way to remove embroidery from your nylon bag! It isn’t difficult at all. In fact, I’d be willing to say it is easier than removing embroidery from shirts. It’s actually quite similar, so if you managed to successfully remove embroidery from your shirt, whether it was put there by hand or machine, you should be just fine when it comes to removing it from your nylon handbag or satchel.
First, you have to pick a starting point to begin tearing the stitches away on the inside of the bag. Personally, I suggest going after a point in a corner or along one of the edges of whatever lettering or logo is on the bag. Hold your bag so that the embroidery is easily accessible. This will make it easy to determine where you want to start and how you want to go about choosing which logo or letter you want to remove first. Make sure that at this point, you have your seam ripper ready to go.
Begin by sliding your seam ripper underneath the thread of the embroidery. Push forward with enough pressure to push the cutting edge accurately behind the sharp pointed fork of your ripper against the threads to ensure a solid and clean cut through the stitches. You’ll want to continue to do these five or six times. Each thread will be located next to one another, this makes things pretty simple, which is nice! You’ll now need to turn your bag cloth over and inside out in order to access the back of the embroidery.
To remove these stitches, take your tweezers and pull the already cut threads through the material to remove them. You’ll eventually have to turn the back over and continue cutting your threads with your seam ripper. Continuously pull these cut threads through the back of the embroidery on your nylon bag, until the desired amount of thread and embroidery is removed.
Helpful Tips and Warnings
Now that you know what you’ll need to do to properly remove embroidery from a shirt, whether it’s hand or machine stitched, and a nylon bag, I have a few tips for you to keep your projects with embroidery removal running smoothly.
First, you want to make sure those tools that I specified are being used. They really do make all the difference. Can you imagine trying to cut such small threats with a pair of scissors? Or even worse, can you even think about how difficult it’d be to pull those threads without a pair of tweezers or a magnifying glass? Especially if you happen to have poor vision.
Next, always remember that when removing embroidery, you’ve to continuously work in the back of the article of clothing or bag in which you’re working on. This honestly makes things a lot easier by giving full open access to the threads that you need to cut in order to get a nice clean removal.
Another thing to be aware of is the fact that there can be layers upon layers of stitches. This can make things difficult as dealing with such small detail in such high volume can be tedious, to say the least. Make sure you’re making the most out of your tools and resources like this one to make things go a lot smoother for you and your project.
Make sure you pay attention to which thread goes first. You usually want to start in a corner or somewhere that allows your seam ripper to almost be guided, allowing you to get a much cleaner cut. You also want to always remember where you began, forgetting could seriously throw you off track and you may end up completely out of luck. No one wants to accidentally ruin their own project!
As I’ve mentioned quite a lot in this guide, make sure you’re working slowly, cautiously, and with maximum effort. One slip up could cost you your project. You may also end up breaking the skin on the tip of your seam ripper. Many of the tools you’re using, like a seam ripper and tweezers, can pose a threat to general health due to puncturing skin and risk of infection. If you work slow, you’re more likely to get a nice, solid job done. One you can be proud of. When you work fast, your final product typically winds up looking pretty sloppy.
Wrap Up:
In conclusion, these techniques all have striking similarities, however, they are also vastly different. When it comes to the tools you’ll need, you’d have a seam ripper, a magnifying glass, tweezers, tape and/or a lint brush, and perhaps the most important tool of all… the patience and willingness to learn from your mistakes. The harder you work, the better your project will turn out! Also see our step by step guide to solving some common sewing machine issues.
Good luck, and happy sewing, everyone!


